Strange things the game walkthrough. Stranger Things: The Game. Return to previous levels
 Live Journal
 Facebook
 Twitter
Use lasers to kill enemies that are immune to your attacks.
Break containers and other objects to get hearts and coins. Each character can break different things.
If you want an easy way to check which object to look for and how much of it you need, open the map inside the dungeon. You can see the progress in the lower left corner.
Unfortunately, there doesn't seem to be a mission log in the game, so pay attention to what the characters tell you. If you miss where you need to go next, look at the map. Usually there is a marker there.
Be sure to collect all the VHS tapes to see a clip from the second season of the series.
Save your coins for things like Aluminum Battery. Try not to spend them on things that you can easily find in locations.
If you get stuck in the Forest Labyrinth and miss your key card, you can buy one at the store.
Chapter 1: The Lost Boys
Shown here is a walkthrough of Hawkins Laboratory.What you can find:
Chapter 2: Gate
Walkthrough of the Forest Labyrinth.What you can find:
Chapter 3: Voice on the Radio
Hawkins High School, chase, quarry and more.What you can find:
Give the romance novel to Flo.
Give the accounting book to Melwald, the store clerk.
Chapter 4: Fire and Water
Sewers, mini-dungeon and library entrance.What you can find:
Give the police sign to Callahan, the policeman.
Give a flower bouquet to the librarian.
Chapter 5: Riddles in the Dark
Hawkins Public Library and return to the laboratory.What you can find:
Give the donuts to the policeman outside Hawkins Laboratory to receive a cathode ray tube.
Chapter 6: Hydra
Part 1The first part of the Hawkins bunker and many side quests.
What you can find:
Give the handcuffs to Powell.
Give lipstick to Carol.
Give the laboratory blueprint to Callahan.
Give the pocket knife to Tommy.
Give a toy robot to the clerk at Bradley's store.
Part 2
The second part of the Hawkins bunker and many side quests.
What you can find:
Give the textbook and cathode ray tube to Mr. Clark.
Give the rubber skeleton to Flo.
Buy milk and give it to Mrs. Wheeler.
Give the pumpkin to Mrs. Wheeler.
Find the keys and give them to Joyce.
Give the phone to Joyce.
Give the nails to Steve.
You can watch the trailer for the second season of the series in the cinema:
Eggo 8 and Eleven as a playable character
Garbage dump, finding Eggo 8 and unlocking Eleven.What you can find:
Find the brake pads and give them to Callahan.
Find the bottle of pop and give it to Tommy H.
Find the game cartridge and give it to the clerk at Bradley's store.
More bonus content will be added later.
Stranger Things 3: The Game
By: BonusXP
Stranger Things 3: The Game is the official game of the Netflix series that follows the third season. If you haven’t seen the show yet, this will spoil it, so I recommend watching it first. There’s a lot of puzzles in the game, as well as hidden items like gnomes. So this walkthrough guide will help you if you get stuck. It’s a work in progress, so please bear with me. Feel free to ask for extra help in the comments section.
Note: This is my first playthrough, so bear with me. I may replay it once I complete it 100% for more streamlined videos.
Walkthrough:
Chapter 1, Suzie, Do You Copy?:
1 Johnny
2 Christine
4 Indiana
9 David
27 Falco
Chapter 2, The Mall Rats:
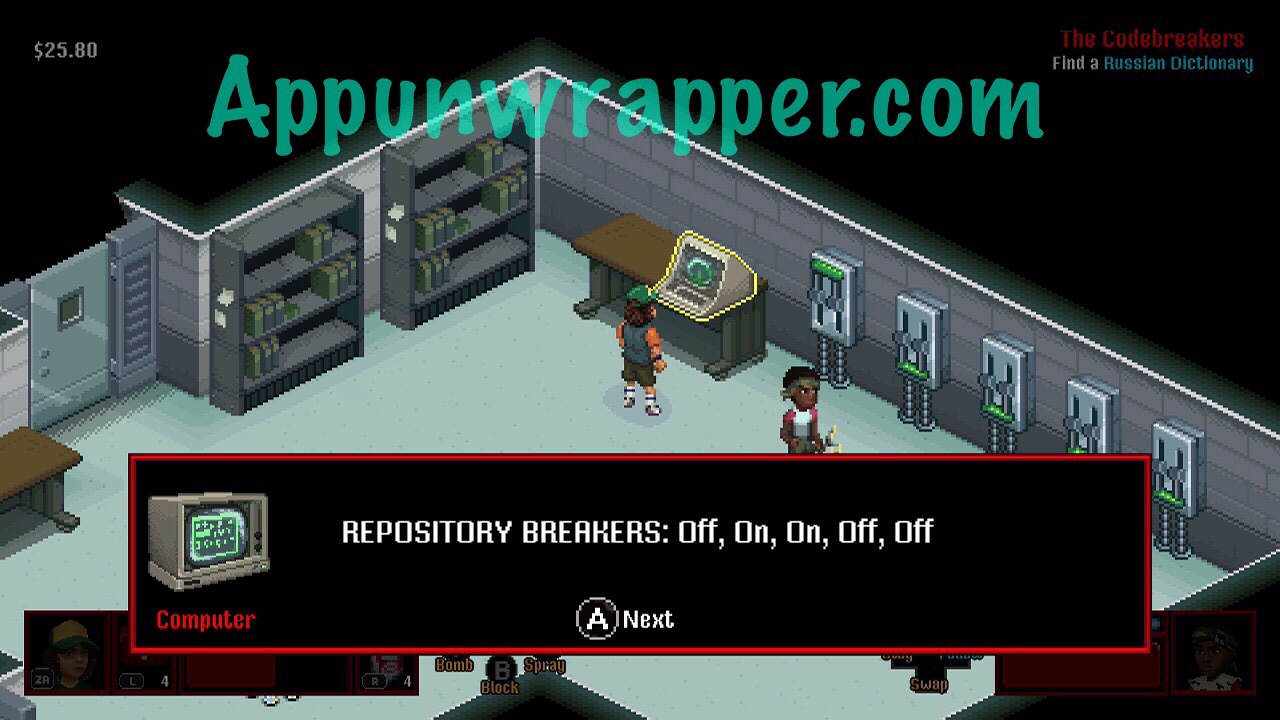
For the library, when you get to the point with the two codes - like Off On On Off Off - you need to use each for the opposite side. That will open the door in the center where the Russian dictionary is found.

Boss: Doris Driscoll
Doris is invulnerable with the lights off. Use one of your characters to flip both switches and turn the lights on. They’ll turn off after a while, so get as much damage in as you can and then turn them on again when they go off. Repeat until this she’s down, making sure to heal when necessary. If any character dies, you have to restart the battle.
6 Elvis
7 Jack
10 Baskin
11 McDonald
15 Denver
37 Magnum
38 Clara
Chapter 3, The Case of the Missing Lifeguard:
3 Doc
8 Flynn
13 Marty
14 Mikhail
18 Norman
19 Herbert
20 Burt
22 Rutger
23 Cruise
29 Sonja
12 Clint
25 Kitt
26 Huey
Chapter 4, The Sauna Test:
30 Ripley
31 Tony
32 Charlene
33 Willie
Boss: Billy
I used Max with +15 Fire damage and Will as backup.
Chapter 5, The Flayed:
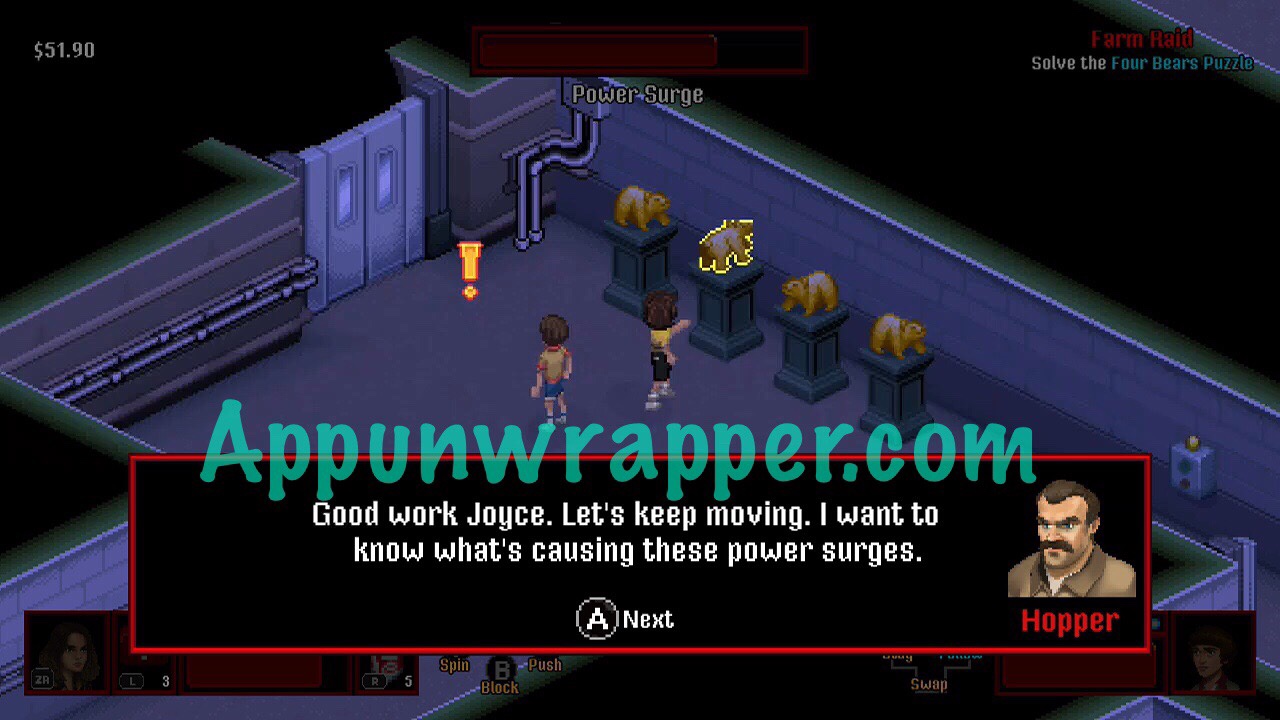
This is how the bears should look:
16 Drago
41 Adora
More coming soon!
***
Note: Sometimes a promo code is provided for a game, but it does not affect the review in any way. At AppUnwrapper, we strive to provide reviews of the utmost quality.
If you like what you see on the site, please consider supporting the site through Patreon. Every little bit helps and is greatly appreciated. And as always, if you like what you see, please help others find it by sharing it.
COPYRIGHT NOTICE © AppUnwrapper 2011-2018. Unauthorized use and/or duplication of this material without express and written permission from this blog's author is strictly prohibited. Links may be used, provided that full and clear credit is given to AppUnwrapper with appropriate and specific direction to the original content.
Netflix released an iOS and Android adventure game for mobile devices based on their hit streaming series Stranger Things. The game is developed by BonusXP and is a mix of Earthbound meets Zombies Ate My Neighbors with a mixture of Jurassic Park from the SNES. If you have the game and you need a bit of help getting through some of the puzzles and areas, there’s a complete gameplay walkthrough guide available.
In the room up above you’ll encounter Lucas, who has a wrist sling for a ranged attack. You can use this to also flip switches at a distance that you couldn’t reach with Hopper.
Go back through the lab and to the room where there was a switch located between some floorboards you cannot reach by foot. Use Lucas to fire his sling at the switch to open the door to your right.
Go inside and kill all the guards and pick up some rock ammo for Lucas.
Head into the next room with the muscle-man and use the sling to kite him to your position. Turn on the laser grid to kill him.
In the next room there’s a man with a gun; shoot him before he shoots you.

In the room below that there’s a series of laser grids. You’ll need to turn the lasers on and off to at the appropriate time in order get past the room.
Venture into the room below, kill the guard and take the green keycard.
Also, there’s a blue button in the room; hit the button to deactivate the blue laser.
Head all the way back into the hallway just to the left of the room with the multi-colored laser grid. Continue to proceed to your left and into the area where there’s a switch that opens a door. Inside the room you'll find the red button. Hit it to deactivate the red laser grid.

You’ll find the yellow switch to the north of where the blue switch is located. It’s in a locked room – use the keycard you got from the guard in the blue switch room to open the door.

Proceed all the way back to the main concourse where the multi-colored laser grid is located. You'll need to fight the evil scientist.
Deactivate the laser grids and then smack him with a rock.
When the scientist activates the deflection shield, switch back to Hopper and get close and punch him in the face like a real man.

Once the scientist is defeated you’ll need to head north to track down Steve the douche bag.
Head outside and deactivate the grid and continue north through the forest.
Kill the stupid owls that fly down from the trees like illegal immigrants swooping down to get on welfare.
Head up into the small shack to get the set of keys. Take them to the house where Joyce is located and give Joyce the keychain.
Go into the bedroom and take the romance novel with the busty lady and the hunk on the cover. Exit the house and keep beating the crap out of owls like the police were beating up old ladies at the voting booths in Catalonia.
Follow the road up north to Steve, who is loitering around like the douche bag that he is. Steve will inform you that Nancy went into the woods. So head right into the woods.
You'll find an entrance to the Upside Down. However, you won’t be able to get into the Upside Down until you get a hazmat suit at the morgue. You’ll find the morgue just northwest of Joyce’s house along the main road.
Head to the morgue and use Lucas to flip the switch using his slingshot.
Go inside and grab the hazmat suit.
Head back to the entrance of the Upside Down and proceed inside. This will end Chapter 1 and start Chapter 2: The Gate.
Once inside, punch the explosive pods toward the tentacles and then wait for them to explode.
In the next screen you’ll need to first punch the explosive pod on the left toward the tentacles twice. And then punch the explosive pod to the right up and over toward the tentacle as quickly as possible. The pod on the right will explode and create a chain reaction that will blow up the pod on the left, along with all of the tentacles.
When you get into the forest area, you’ll need to shoot down the beehive to lure the black bear out of its area. While the bear is eating the bees, shoot the other beehive (using Lucas) to the right of the broken log blocking your path. This will cause the bear to run through the log blocking the path and eat the honey from the hive, providing you a passageway through to the next area.
Head south and open the green chest to retrieve the green keycard and then head north to open the gate.
Head left and you’ll need to activate a switch in order to open the two gates.
Head up and shoot the beehive to attract the black bear, then while he's distracted, shoot the bear trap to open a pathway for him, and then shoot the second beehive to get him in position – proceed to shoot the third beehive up above to get the bear to break through the log.
Head over to the far left before you proceed in order to open up the green box and retrieve the keycard.
Then head up in to the next segment and proceed to your left and through the gate past the guards to retrieve one of eight of the VHS tapes.
In the screen with the bear and the next gate switch, shoot the bear trap using Lucas, then shoot the first beehive to attract the bear, proceed to shoot the next beehive above the log blocking the pathway to create a route to get to the switch so you can open up the second gate.
Travel into the next section and defeat the enemies, including the owls and the guards. Keep moving through the area, traveling north, to uncover another chest with a green card inside.
Proceed back down to the area where you can either go to your left or down. To your left there’s an area with a muscle man, some beehives, and a bear. You have to shoot the first beehive to lure the bear down and then shoot the beehive behind the muscle man to get the bear to kill the muscle man and allow you to get the keycard.

The next puzzle is a little trickier, as you’ll have to lure the bear down, and use Lucas to shoot the beehives to get the bear to break through the log so you can get to the next screen. You'll find Nancy in the next screen and she has a club that she can use to break through trees.
The next switch is located back down and through an area where there are two routes – one route has a bear up top near a switch and the other route has a bear trap below. You need to flip the switch to open the gate, and then quickly use Lucas to shoot each of the traps to pave a way for the bear in order to get to the honey.
Flip the switch once you’re done to open up the next gate.
You’ll then be able to proceed into the next segment where the forest ambushers are located.
- Simple and interesting dialogues for preschoolers and elementary school children with voice acting
- Transcription, pronunciation and translation of English words online
- All fingers and thumbs idiom translation
- Presentation on chemistry "ketones" Presentation of aldehydes and ketones
- Stranger Things: The Game
- The Great Battle of Molodin
- Terraforming Venus